Written by Ralph
As a Canadian living in Germany, I have no right to tell anyone how to cook this American classic, famous in Texas. Then again, one origin theory suggests that German immigrants brought meat-smoking techniques to Texas barbecue.
Last Christmas, when we were in Canada, my brother-in-law Carl made two styles of brisket on his Big Green Egg pellet grill: the flat, cooked traditionally, and the fatter portion called the tip cubed and smothered in BBQ sauce at the end of the cook. Both were fantastic, and my son insists Carl’s brisket is better than mine—so I have to keep trying.
I began making smoked brisket after learning that our local butcher, Hoose Landschlachterei, offers brisket for reservation every couple of weeks and spent a lot of time researching how to smoke brisket on my Weber grill. I tried the ‘snake’ method for arranging the charcoal but had to abandon it because it wouldn’t stay lit. Instead, I reverted to the off-heat method. Since my old Weber kettle grill lacks a built-in thermometer, I kept opening the lid to check if the coals were still burning, which caused heat loss and required frequent reheating.
After overcooking my first brisket (it still tasted great but was chewier than I wanted), I bought a thermometer, drilled a hole in the lid, and installed it. My next attempt was with a beautiful brisket from our Wagyu bio farmer/butcher, Buchenhof. Research suggested maintaining the heat at 75–80°C (167–176°F) and using mainly smoke for cooking would yield the best results. However, after 13 hours, the internal temperature was still only 160°F, and since it was past midnight, I had to go to bed. I wrapped the brisket (more on that later) and let it rest overnight. The flavour was incredible, but the texture still wasn’t quite right.
Lessons Learned
Never give up! I’ve learned patience in cooking through trial and error. With steak, it took me 10 years to nail it almost every time and have no fear of ruining a great rib-eye.
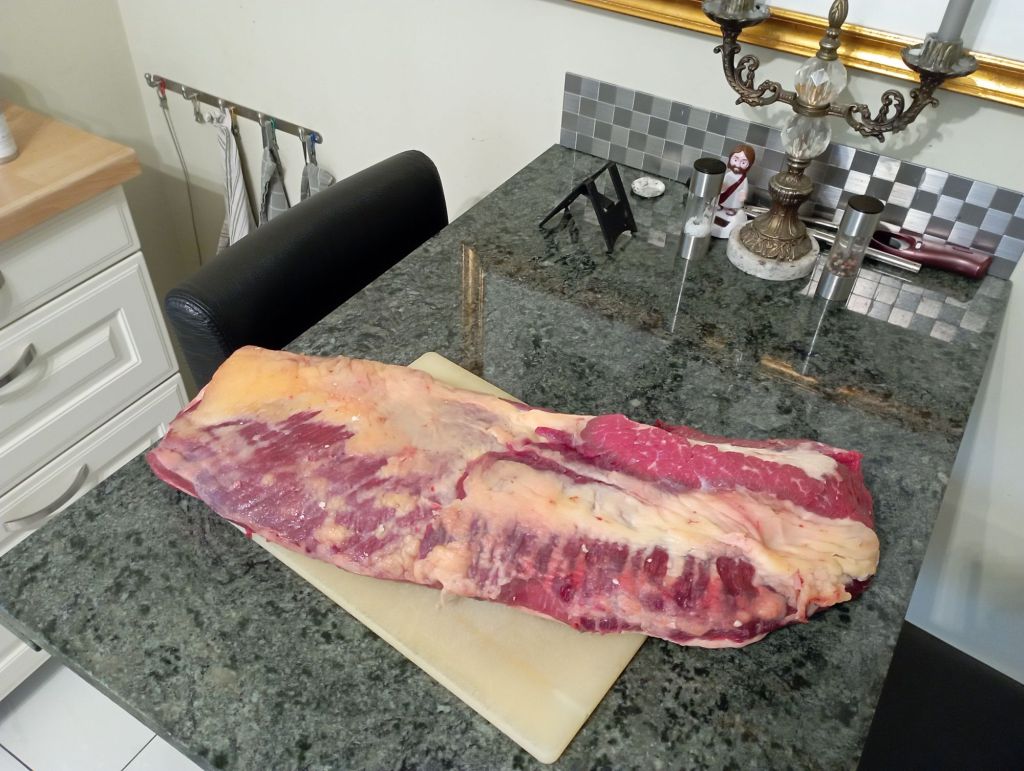
For my third attempt, I went back to Hoose and bought a whole brisket, divided it in two, trimmed the fat, and froze both pieces. (Mogly was treated to brisket fat in the latest batch of his dog food). We extended a dinner invite to a meat lover work friend and his wife who live in an apartment with a small balcony so can’t charcoal grill. Also invited were our previous neighbours and friends from when we lived in Aachen. Suddenly, I had a dilemma: half a brisket wouldn’t feed eight people, but my small 42” Weber grill couldn’t handle a whole brisket.
(Un)fortunately it was already autumn, and all of the BBQ stuff was greatly reduced at the local building and garden stores. Being a Weber apostle, I shopped around, convinced I could score a larger 54” Weber kettle grill for a good price and didn’t bother looking at other brands of grills.
I found one for a good price (over 100€ discount) so I earmarked that and headed to one more store to see if I could get a better deal. This store also had a similar price on the same Weber but there was also this other grill—German brand called Rösle—that caught my eye and was on sale for an unbelievable 150€ from a normal price of 399.99€!
Having passed the point in my life where I jump at a cheap price only to pay for it in quality, I took a good hard look at this Rösle grill. In business since 1888, Rösle has an excellent reputation for their grills, and the company also makes pots, pans, and kitchen accessories. The Rösle grill had an excellent build quality and some features that even surpassed the Weber (which would have been at least 100€ more):
- Hinged lid: Unlike the inelegant Weber’s wire holder, the Rösle’s lid was sturdier and more convenient.
- Better venting system: Unlike Weber’s vents, which are positioned on the lower side of the kettle where ashes fall when set up for direct heat and often become clogged, the Rösle design avoids this issue. While Weber has improved the handles for its vents, making it easier to move them back and forth to allow ashes to drop into the catch-pan, the system is still not ideal—especially when fat drippings create a sticky, gummy mess. Rösle uses a dial/crank mechanism that raises and lowers the catch-pot beneath a large hole in the bottom of the kettle. This design effectively controls airflow as needed while allowing ashes and grease to drop easily into the pan without being obstructed by the vents. The pan easily lifts out for emptying and cleaning.
Rösle’s venting system is what sold me (and the great deal)! The only negative was that the pan also fills up with water if it rains heavily between grill sessions, but this was easily resolved by buying a cover (also at a great end of season price).
So, now I had my brisket(s), a grill big enough to easily handle a full cut, and a chance to pull off a great American classic for some German friends.
The Rub
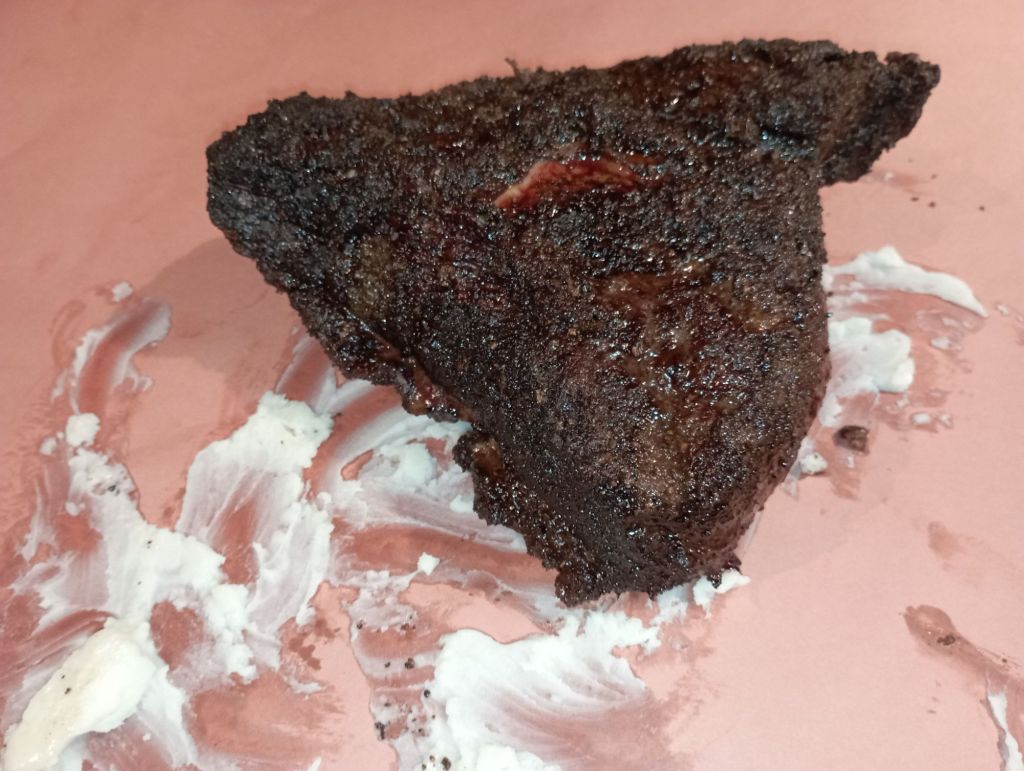
Because the Brisket cut is naturally flavourful it doesn’t need a whole lot of herbs or mustard or other competing tastes. To achieve the coveted “bark” you do need a dry rub. I use a simple dry rub of black pepper, and salt in equal parts and garlic powder or flakes at half the amount (2/2/1). I have used this rub for each attempt because the taste is great and it has always resulted in a nice bark no matter the other issues with the roast. For the best results, rub it all over making sure you cover all exposed meat and fat.
The Setup
I filled the indirect coal tray with chunk charcoal and got it glowing. With the bottom vent fully open and the lid off, I placed the brisket on the indirect side once the coals were ready. I then closed the lid with the upper vent fully open.
The Cook
Learning from my last attempt, I decided to maintain a temperature of 125°C instead of under 100°C. Once the grill reached this temperature, I adjusted the bottom vent to half-closed and fine-tuned the upper vent to maintain it. When the temperature stabilized, I added a piece of cherrywood for smoke.
As the coals burned down I added more, and also added more cherrywood when the smoke tapered to nothing, always maintaining temperature. I found this needed minimal adjustment after the first fluctuations.
After about 5 hours, I checked the internal meat temperature and it clearly needed more time to reach the 185-190F I was looking for. I didn’t bother leaving the remote probe in as I had to open the grill occasionally anyway to add coal or wood. I tried to leave these intervals as long as possible to reduce the heat loss.
The Wrap
After 9 hours the internal temperature was right so it was time to wrap. I bought butcher paper after the first try without wrapping (just resting) because my on-line research told me this was as critical as the cook. Some pit masters wrap earlier and put the wrapped brisket back on heat for a few more hours and others finish with the wrap. I decided to finish with the wrap because my grill isn’t really a smoker- just a sort of combi grill/ smoker.
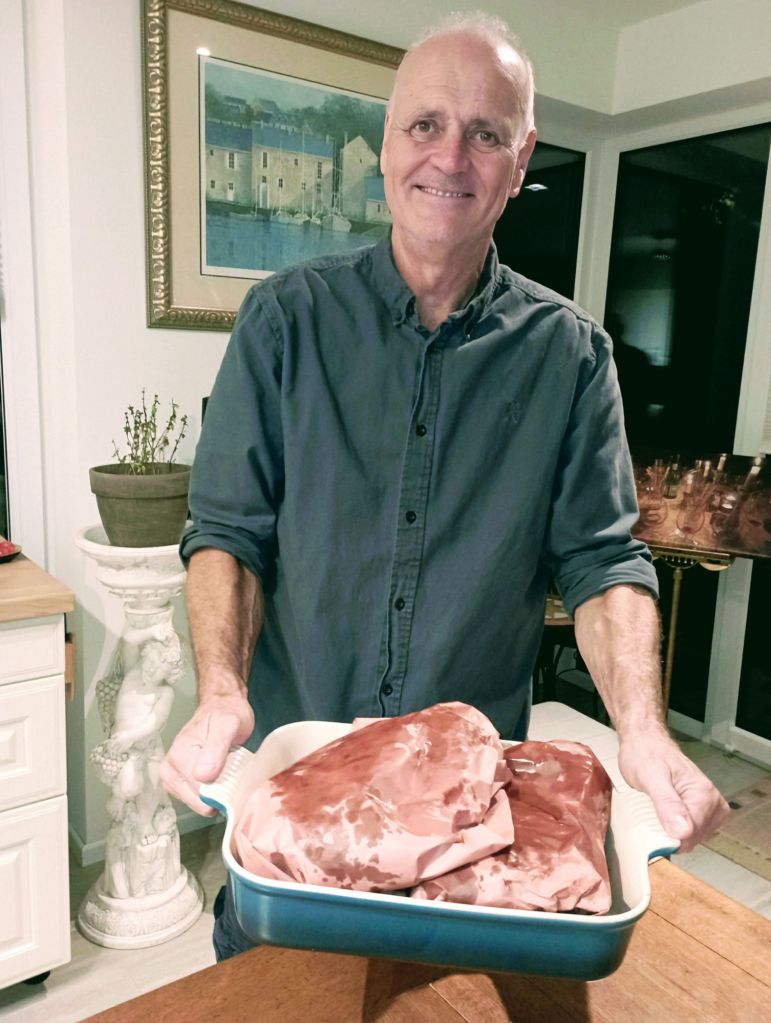
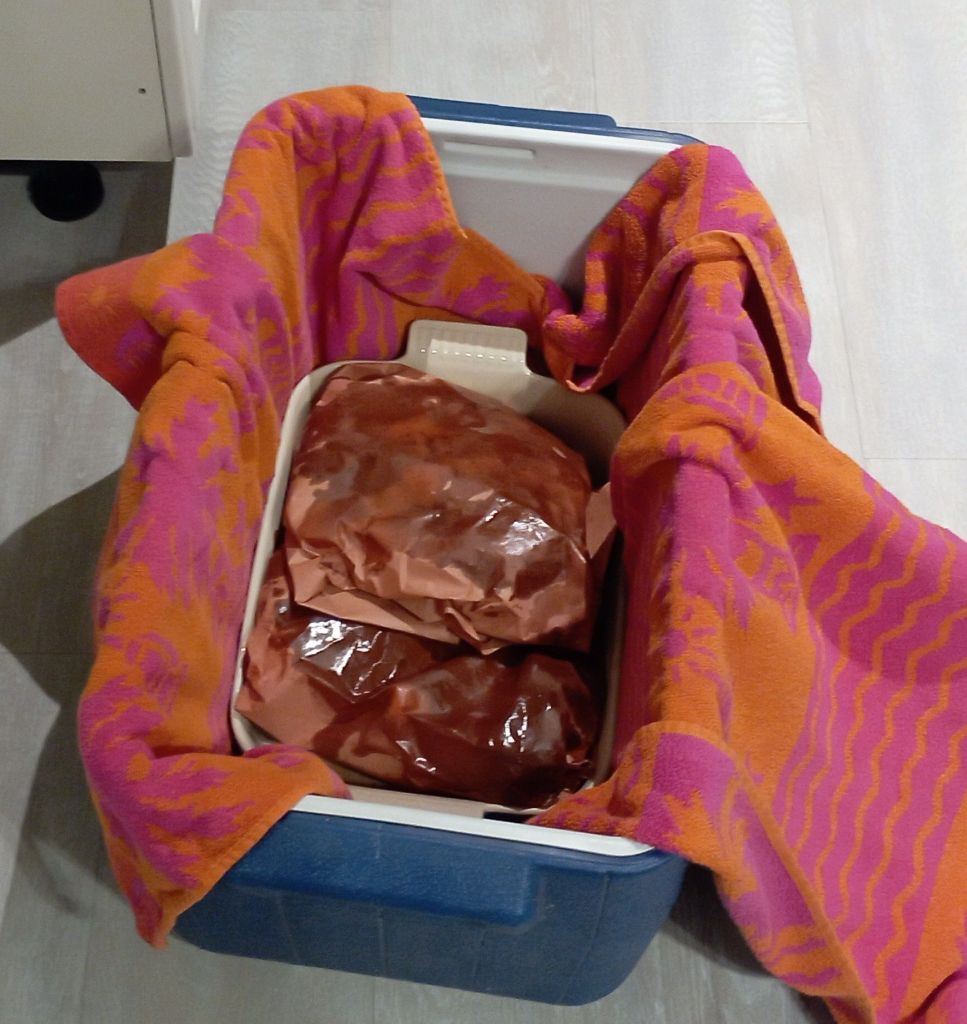
I now have some beautiful beef tallow always available, so I smeared the paper with a good and wrapped up each half of the brisket. I placed the two pieces in a large stainless steel roaster, wrapped it in a thick towel, and put the roaster into a cooler with the lid closed and left it overnight to slowly cool.
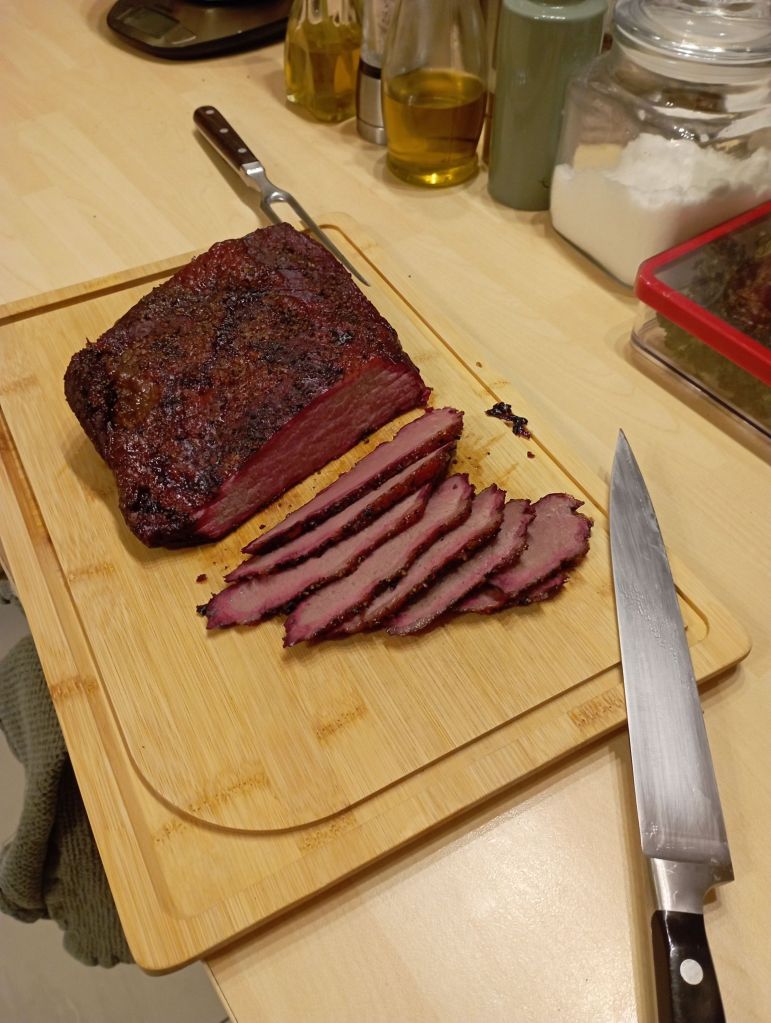
The Final Cut
A couple of hours before the planned meal I put the roasting pan with the brisket still wrapped in the oven at 120°F to warm slowly back up without being hot enough to cook. Twenty minutes before serving, I unwrapped them and sliced them across the grain into 1.5cm (½ inch) thick slices. Since they rested all night and day they didn’t need to rest again to bleed out.
Next time (and there will certainly be one!), I plan to remove the flat (thinner, flat piece) about an hour before the thicker triangular tip and wrap it sooner to prevent it from getting overdone and drier while the tip portion finishes cooking.
Recipe for Beef Brisket on a Charcoal Grill
Ingredients
For the brisket:
- One whole beef brisket, trimmed and divided into tip and flat (there are plenty of good videos available showing how to do this—here’s one I found useful). I trimmed it myself instead of having the butcher do it because I wanted the fat for dog food.
- One knob of beef tallow for wrapping
- Butcher paper for wrapping
For the rub (enough for more than one brisket):
- ½ cup garlic powder
- 1 cup coarsely ground black pepper
- 1 cup Himalaya or other coarsely ground salt (not table salt- too fine)
For the smoking process:
- Chunk charcoal (sufficient for 9+ hours of indirect heat)
- Cherrywood or other like mesquite chunks (for smoking)
Instructions
1. Prepare the Brisket:
- Trim the excess fat from the brisket (reserve for dog treats, if desired!).
- Mix the garlic powder, black pepper, and salt in a jar to create the dry rub.
- Generously coat the brisket with the dry rub, ensuring all surfaces are evenly covered.
2. Set Up the Grill:
- Fill an indirect coal tray with chunk charcoal and ignite until glowing.
- Open the bottom vent fully and keep the lid off to allow the coals to heat up.
- Once ready, place the brisket on the indirect heat side of the grill, and close the lid with the upper vent fully open to let the temperature rise past the desired 125°.
3. Smoking Process:
- Maintain the grill temperature at 125°F (52°C) by adjusting the vents.
- Add a piece of cherrywood to the coals to start the smoking process.
- Monitor the temperature and replenish the coals and wood as needed, ensuring a steady supply of smoke.
4. Check the Internal Temperature:
- After about 5 hours, check the internal temperature of the brisket. The target temperature is 185–190°F (85–88°C).
- Continue smoking, maintaining the temperature, and checking every few hours.
5. Wrap the Brisket:
- Once the internal temperature is right, smear a piece of butcher paper with beef tallow
- Wrap the brisket tightly in the paper and place it in a roasting pan.
- Cover the wrapped brisket with a towel and leave it in a cooler to rest overnight.
6. Reheat and Serve:
- Two hours before serving, warm the wrapped brisket in the oven at 120°F (49°C).
- Just before serving, unwrap the brisket and slice it against the grain into 1.5 cm (½ inch) thick slices.
Serving Suggestions:
We’ve served Brisket with German Rotkohl (cooked red cabbage) and boiled potatoes. You can also serve it with classic BBQ sides like coleslaw, sauerkraut, or Oma Marion’s German-Style Warm Potato Salad with Bacon.


5 Comments Add yours